Running a NeuralNet live in Maya in a Python DG Node

You’ll need these resources to follow this tutorial
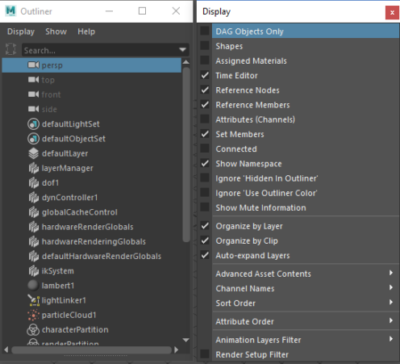
DG (Dependency Graph) nodes are the atomic elements that make up a Maya scene. You can list all the DG nodes in your scene by unchecking the option to list only the acyclic ones (DAGs) in your outliner.

And you can inspect how DG nodes are connected using the Node Editor (Windows > Node Editor).

You can create DG nodes with custom, inputs, outputs, and computations in Python or C++. I’ll use Python for this tutorial.
To declare your custom DG node, you’ll need to create a Python plug-in for Maya. This is just a .py file where you will declare the name of your node, its attributes and the computations it should perform. Here is the collapsed anatomy of a Python plug-in that implements a single DG node. You can download this template in the resources for this article.
In the code above we load the OpenMaya API (1) and inform Maya we’ll be using OpenMaya2 (2) by declaring a maya_useNewAPI function. This is a convention. Then (3) we give the node a name and a unique hexadecimal ID (more conventions). If by any chance you have another node registered under the same ID Maya will not load your plug-in.
We create a class based on OpenMaya’s MPxNode, a class for custom Maya nodes. This is where we define the computation. We define functions to create and initialize the node. We define a function to declare the properties of the plugin. And finally, we define the functions that should be called for plugin initialization and uninitialization.
The things you got to look out for are the (4) definition of the class templateNode() and (5) the init() function.
Init function
In the init function we create all of the node’s the input (1) and output (2) attributes. Attributes are based on the appropriate OM classes, such as MFnNumericAttribute for numbers and MFnTypedAttribute for other types of data. Floats should be declared as OM’s kFloat type. Inputs should be writable, while ouputs should not, for they are the result of the node’s computation.
After adding attributes to the node (3) you’ll need to specify which inputs trigger the computation of specific outputs (4). In our template example we’ll sum the values of ‘a’ and ‘b’, thus changes in both ‘a’ and ‘b’ affect the result.
Computation
The computation is defined in the compute method of our MPxNode based class.
The data comes from Maya’s dependency graph through the data block. From it, we retrieve the handles for inputs and outputs. We then retrieve values from the input’s handles, perform the computations, and set the values in the output handles.
Result
If your code is correct you can tell Maya about the location of your plug-in. Edit the Maya.env file (that lives in your Username\Documents\Maya\MayaVersion\ folder) and include the following line:
Load your plug-in in the Maya plug-in manager, and search for the name of your node in Maya’s Node Editor. You can test if computations are being performed correctly by changing the inputs and hovering your mouse over the outputs to see the results. Now let’s implement a Neural Network inside this Python DG node.

Running a Neural Network model inside the DG node
In this example, we will use the Neural Network we have trained in the previous tutorial, that classifies types of plants based on the sizes of petals and sepals. If you haven’t followed that tutorial, I highly recommend you do so. You can download the trained model and the Maya scene in the resources for this article. After changing the name and ID of our template node, you’ll need to change its input and output attributes.
Input and output attributes
We’ll change the input and output attributes of our node to match those of our neural network. The trained model has 4 inputs: sepal length, sepal width, petal length, petal width; and 3 outputs: probability of being type Setosa, probability of being type Virginica, probability of being type Versicolor. For simplicity we’ll not output each individual probability as a scalar value but one string with a list of all probabilities and another string with the name of the winner. This is how the init function should look:
Model computation
To load the trained model and feed data to it you’ll need to load the Keras and Numpy libraries, so make sure you add the following code to the beginning of your Python plug-in:
You can change the computation of the node to load the new input and output attributes that were created (1). Then we get the float values from the inputs and make Numpy floats out of them so Keras don’t throw warnings (2). Build an NP array to feed your model, just how it has been discussed in the previous tutorial, load the model from the ‘h5’ file and get the predictions (3). Once that is done you can set the ‘winner’ and ‘probabilites’ outputs (4).

Performance wise there is a problem with this code. We are loading our model from disk at every evaluation. From a usability perspective, it would be better to load the model with a file browser and to have the winner’s name instead of its index. Let’s address these issues.
To load the model only once you can define it outside of the computation node. One easy way to do this would be to declare it alongside your global variables, as such:
Removing hardcoded file path
If you don’t want to hardcode the path to the model, and if you want to eventually make it a node attribute a better alternative might be to create a cache that only gets updated when the path to the model changes. In such a way:
If you choose to use this ModelCache you’ll need to create a global instance of it that can be called during computation time, like so:
You can load this input attribute as you would any other. If you need a detailed implementation of this code please check the resources for this article.
Adding class (plant) names
Finally, to output the name of the winning class instead of its index, all you need is a dictionary like this:
In conclusion
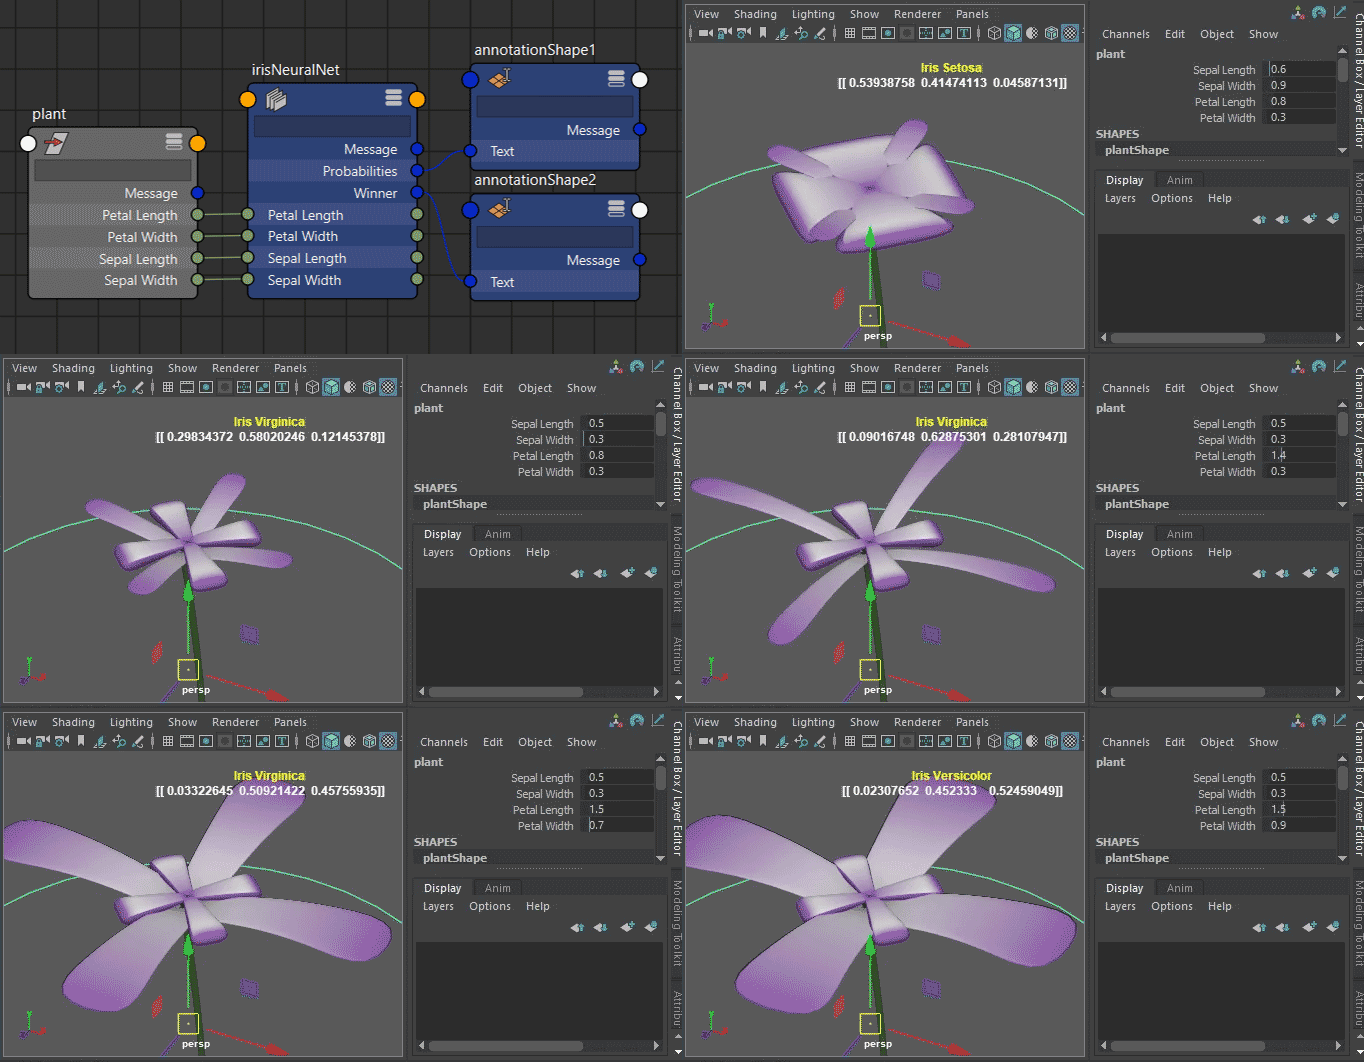
When everything is ready and properly connected it should look like this:Iris model running live inside a custom Python DG node

In the first tutorial of this series, you learned how you can train a Neural Network to classify any group of scalar values in your Maya scene. You have seen how this works in the example of a procedural flower from which parameters can be used to classify its type. In that first tutorial, the classification was done from within Maya’s script editor. Now you have learned how to do the same computation directly inside Maya’s dependency graph. This means you can use your Neural Network’s output to drive any other node in Maya interactively! In the image above you can see these outputs influencing annotation objects, but these could be any other Maya nodes. I hope you can see the potential in this.
Last updated